Bleed, trim, and safe areas explained

These three concepts are the foundation of setting up any print file correctly. Whether you're ordering business cards or a 4-foot banner, understanding them will save you from reprints and surprises.

The three zones of a print file

Every well-set-up print file has these three zones. Here is what each one means and why it matters.
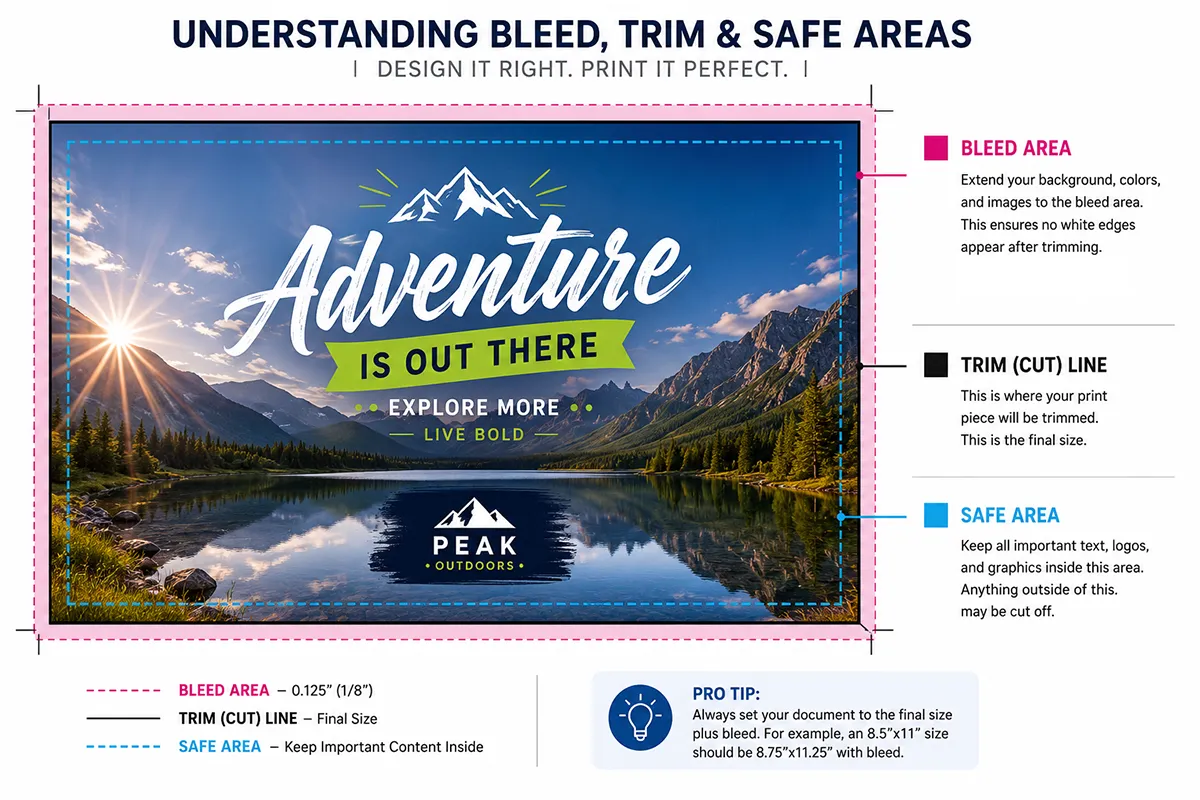
Bleed, trim, and safe area diagram
BLEED

Bleed

Bleed is the extra artwork that extends beyond the final cut edge of your design. It exists to account for slight shifts that happen during cutting. Without bleed, a small shift during trimming can leave a thin white border along one or more edges of your finished piece.

Standard bleed: 0.125 inches for small prints (business cards, postcards). 0.25 inches for large format (banners, yard signs).

TRIM

Trim Line

The trim line is the actual finished size of your print — exactly where the cutter will cut. This is the size you order. A business card ordered at 3.5×2 inches will be cut to exactly 3.5×2 inches. Everything outside this line gets cut away.

Think of it as: the size your finished product will be in your hand.

SAFE AREA

Safe Area

The safe area is the inner zone where all of your important content — text, logos, phone numbers — should live. It sits inside the trim line and gives a buffer so nothing critical gets too close to the edge and risks being cut off.

Standard safe area: 0.125 inches inside the trim for small prints. 0.5 inches for large format.

How they stack together

Picture your design as three nested rectangles, from outside in:

BLEED

Outermost zone

Extends beyond the trim. Fill this area with your background color or image. Nothing important should be placed here — it will be cut off.

TRIM

Middle zone

The finished size of your print. The cutter follows this line. Background colors and images should extend past this line into the bleed area.

SAFE AREA

Innermost zone

Keep all text, logos, and important content inside this boundary. This protects your content from being too close to the cut edge.

Standard settings by product

Product Bleed Safe area Notes
Business cards 0.125 in 0.125 in Standard size 3.5×2 in
Postcards & flyers 0.125 in 0.125 in Apply to all four sides
Folded cards 0.125 in 0.125 in Set bleed on outside edges only
Posters & large photos 0.25 in 0.25 in Bleed especially important at larger sizes
Vinyl banners 0.25 in 0.5 in Extra safe area keeps content away from grommets
Yard signs 0.25 in 0.5 in Double-sided signs need separate files for each side
Stickers & labels 0.0625 in 0.0625 in Die-cut shapes need bleed following the cut path

How to set up bleed and safe area in your design software

Instructions for the most common tools our customers use.

1

Adobe Illustrator

When creating a new document, enter your finished (trim) size and set the bleed fields at the bottom of the dialog. Illustrator will show a red bleed border around your artboard. Keep all important content inside the artboard boundary (trim line) and extend backgrounds into the red bleed area. When exporting as PDF, check "Use Document Bleed Settings."

2

Adobe InDesign

Set your document size to your trim size. In the New Document dialog, expand the Bleed and Slug section and enter your bleed values. InDesign will show a red bleed guide and a blue margin guide. Use the margin guide as your safe area boundary. When exporting as PDF, go to Marks and Bleeds and check "Use Document Bleed Settings."

3

Adobe Photoshop

Photoshop does not have a built-in bleed setting. Instead, create your canvas larger than your trim size to account for bleed. For example, for a 4×6 inch postcard with 0.125 inch bleed, create your canvas at 4.25×6.25 inches. Use guides to mark the trim line and safe area boundaries so you know where to keep important content.

4

Canva

Canva has a built-in bleed feature for print products. When setting up your design, turn on "Show print bleed" under File settings. Canva will display a bleed border and a safe area guide. Keep all text and logos inside the inner guide. When downloading, select PDF Print and check "Crop marks and bleed" to include the bleed in your file.

5

Microsoft Word or PowerPoint

Word and PowerPoint are not designed for print production and do not support bleed natively. If you're designing in these programs, make your document slightly larger than your finished size to simulate bleed, and keep all content well away from the edges. For best results, export as a PDF. If your design requires precise bleed, we recommend switching to Illustrator or Canva.

6

Not sure if your file is set up correctly?

Bring your file in before you place your order and we'll check it for you. Catching a bleed or safe area issue before printing is much easier than reprinting an entire order. We can also adjust your file in most cases for a small setup fee.